Everyone likes a good recipe, but lets face it, usually they don’t go the way they’re supposed to and are about as easy to follow as a squirrel in the woods (that’s not very easy with the whole climbing thing). I don’t like the concept of a “Recipe.” It is deceiving. Recipe implies that you throw all the ingredients together, set the oven, and in the specified time ding it’s done. Wrong. There are too many variables to account for to have a simple “Recipe” for success - differences in ingredients, temperatures, ovens, under-mixing, over-mixing, resting too long, not resting enough, relative humidity... and the list goes on and on. Intimidating huh? No worries, this doesn’t mean it has to be difficult. We just need some directions telling ‘the when’, ‘the how’, and ‘the why’, not just ‘the what’.
Want to make a good, simple berry pie that doesn’t leak juices and can actually be cut into one singular slice rather than a globby pile of crust chunks and berries? Okay good – lets do it.
 |
| Figure #1 (Test fitting some berries) |
The first task is berry acquisition. Check out our
Berry Blog if you want to learn how to pick your own. Otherwise hit the store, but your pie just will not be as good as wild berries, sorry it’s true.
Fresh is best, but frozen can be chosen (if you use frozen, let them thaw before using). So how many berries do you need? The answer to that is however many it takes to fill up your intended pie pan. View Figure #1. Test fit your berries in the pan of your choice and make them more or less level with the top edge of the pan.
 |
| Figure #2 (Sliced cold butter ready to be mixed with flour.) |
Good crust is a must. Hopefully you don’t plan on using a crust you made weeks or months earlier that you’ve been storing in the freezer, or heaven forbid, a pre-made, store bought crust in a box! Seriously though, fresh crust is easy to make, it tastes better, it holds together better, and it’s easy to make (did I say easy to make already?).
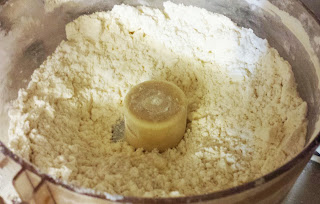 |
| Figure #3 (Mealy flour with the butter cut into it.) |
Here’s the deal: one cup flour to every 1/3 cup
COLD butter – use that ratio to make all of your crusts. Depending on the size of the pie, scale it up; I usually use
3 cups flour and
1 cup butter, and I find that makes enough crust for a large pie and you have enough left for some top crust too! Use
COLD butter and cut it all up with a knife into little chunks (this just speeds up the process). Dump your
flour and a couple pinches of
salt in a large bowl and dump the butter chunks on top (they’ll stick together, no biggy). View Figure #2.
Use your finger tips or a potato masher to break down the butter chunks until the flour/butter mixture is mealy like corn meal. It doesn’t have to be perfect, don’t worry about it. View Figure #3.
 |
| Figure #4 (Don't mix past this point!) |
Now we add
COLD water and stir to get the dough to come together. Add a few tablespoons of water and start stirring with a large spoon. Keep stirring and add additional tablespoons of COLD water one at a time until the dough comes together. View Figure #4.
Pile the dough into a giant hamburger patty and toss it in the freezer to chill it down, not freeze (the thinner the patty the faster it will chill). The dough doesn’t have to be chilled to work, it is just much easier to roll out and use when it is good and cold. View Figure #5.
 |
| Figure #5 (Pie crust patty) |
***If you don’t want to work hard, use the food processor to combine the flour and butter quickly. Then add a tablespoon of water every few seconds on the processor until the dough starts coming together.
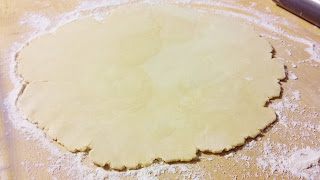 |
| Figure #6 (Rolled out crust with cracking edges) |
If you have berry juices in your pie pan, wash them out and dry the pan. After the dough has been chilled, flour the table (if you’re rolling the dough on the table that is, otherwise that’d be a waste of flour). Roll out the top of the dough until it is about 1/8 inch thick (doesn’t have to be perfect, but I wouldn’t go any thinner than 1/8 inch otherwise the crust will be a little weak. The rolled out dough needs to be larger than the pie pan which shouldn’t be a problem. Also, the crust should crack on the edges as you roll it; this means the crust has not been over-mixed and will be the right finished texture. View figure #6. If the crust holds together and seems elastic'y and pulls back while it is being rolled out, the crust has been overworked and will yield a tougher crust.
Squirt a thin spray of non-stick spray onto the pie pan (insurance), and carefully put the rolled out dough onto the top of the pie pan. View Figure #7.
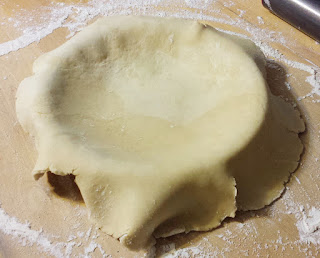 |
| Figure #7 (Crust lying over the pie pan) |
Push the dough down into the pie pan so it is touching all surfaces inside the pan, and if you make holes or tear the crust just use some extra dough to patch it up. Once the dough is lying in the pie pan nicely, just trim along the top rim and put the extra dough in a pile. Go around the top rim of the pie crust and push it back from the lip so it sticks up rather than lying on the top rim (this makes it about 900 times easier to take pie pieces out of the pan without wrecking the crust). See Figures #8.
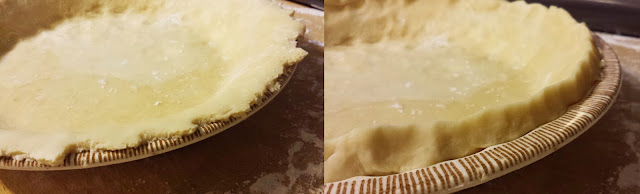 |
| Figures #8 (Trimmed crust on the left, and pushed up crust on the right) |
-STEP 4-
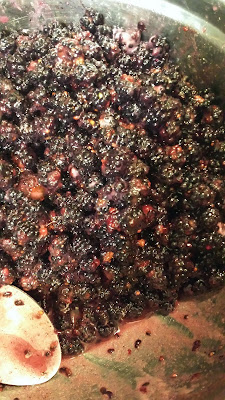 |
| Figure #9 (Sugared & corn starched berries after mixing.) |
Back to the berries. Take all of the berries you pre-fit into the pie tin and put them in a large mixing bowl. First thing I do is add sugar to the berries. For most pies, a cup of sugar will work well, and if you like it a little less/more sweet just subtract/add accordingly (I wouldn’t go less than ¾ cup sugar or more than 1 ½ cup). The sugar is not that critical in how the pie turns out. The corn starch however is important, and you must get enough in there unless you prefer berry soup. If you don’t have enough corn starch the pie will be runny, but still delicious, especially in a shake.
3 Tablespoons of cornstarch is usually enough to thicken a pie pretty well. Just sprinkle 3 tablespoons over the top of the berries and use a spoon to mix them all up until it is fully combined. If there is watery liquid in the bottom after a thorough mixing, drain it off then add another ½ tablespoon of cornstarch to the drained berries and mix it in. We don’t want much watery liquid in the bottom because it may not set properly if there is too much; a little bit is no problem, but if it looks like berry cereal it won’t work. See Figures #9.
-STEP 5-
Take your newly starched berry mixture and spoon them into the crust. Pat the berries down so
 |
| Figure #10 (Berry mixture spooned into crust and leveled.) |
there are minimal air spaces and the top is flat’ish, and fill the berries up to the rim of the crust (don’t mound them on or they will boil over in the oven... They will probably boil over anyway, but that's the price of pie). See Figure #10.
If you have enough crust left over, you can roll it out again into a thin sheet no thicker than 1/8 inch (we want thin on the top crust). You can do a dough sheet over the top for a top crust, or my favorite, you can do a classic lattice top which is way easier than it looks.
-STEP 6-
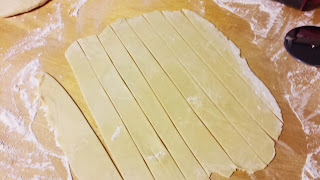 |
| Figure #11 (Rolled and cut top crust.) |
After the dough is rolled, cut into strips however wide you want (wider strips means faster lattice weaving). I usually cut them an inch or so wide. See Figure #11. Start with your longest strips and make an X on the pie. Take your next two longest pieces and put them parallel to the first strip you put on the pie leaving a space between the strips. See Figure #12.
 |
| Figure #14 (Two pieces placed.) |
 |
| Figure #13 (Pull center piece ends back) |
 |
| Figure #12 (2 pieces after initial X.) |
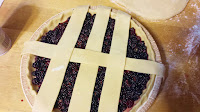
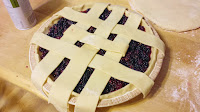
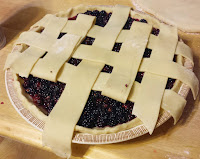
Next take the ends of the first dough strip you put down and fold them up out of the way and put down two more strips that should go across the two you just previously laid down. Move the pulled back ends of the center piece over the two that have just been placed. See Figures #13, 14 and #15. Continue this pattern until you run lattice to the edge of the pie. All excess can be pinched off and crimped onto the main pie crust.
 |
| Figure #17 (Trim excess and pinch) |
 |
| Figure #15 (Straighten middle piece.) |
 |
| Figure #16 (Continue lattice) |
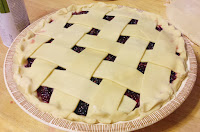
-STEP 7- After you finish crimping your top crust off to the bottom crust edges, the pie is ready to hit the oven. I like to cook my pies at 350 degrees, and make sure you put them on the bottom rack. How long to bake? Until it is done is best right? Every pie, oven, and pan is different so don't set a time and call it done. What you need to have happen is the corn starch to hit the temperature where it begins to thicken. This usually hits its peak around 170 degrees. If you have a probe digital thermometer with an alarm you have it made; just stick the probe into the center of the pie and set for 170. If you don't have a thermometer, watch for the pie filling to start to bubble inside the cracks in the lattice (not just around the edges). When the pie filling starts to boil it should be over the 170 mark and hit the maximum thickening point so you won't have runny pie. PUT SOME FOIL ON THE BOTTOM OF THE OVEN TO CATCH BOILING OVER PIE FILLING SO YOU CAN QUICK PULL IT AND THROW IT WITHOUT CREATING A SMOKE BOMB!
Most pies will be done in 45 minutes to 1 hour. Once you pull the pie, be sure to let it cool and the liquids should set into a very slice friendly pie. The best part is that this recipe could be used for all kinds of berries. Give it a shot and let us know how it works out! Feel free to add some citrus juice or zest, cinnamon or other spices, egg wash the top crust for golden brown and maybe a little large crystal sugar sprinkled over the top. The sky is the limit. Bake on!


